
Magazines letting off Steam? (Magazine Leak Fix)
- Jan 13, 2018
- 3 min read
We're going to take a look at a couple of things here.
First off lets cover the difference between the gas pressures that the TM and clone magazines can take.
The clone magazines can take any pressure of gas from factory, suffering only from the usual O ring issues that all gas magazines are prone to. So keeping them full and not storing them empty is the way. If the O ring does fail then you can still follow the steps below to strip and replace the O ring, just omit the procedures of drilling the locking pin and sealing the valve.
Now with the genuine Tokyo Marui magazines there is built into the base a safety blow off valve. This can seem just like a leaking O ring when this leaks off. This is designed to leak off excess gas when the pressure is too high inside the magazine reservoir so can put people off using higher powered gasses. In winter months this is not usually an issue but can be a game of chance when the weather warms up or if you live and play in a warmer climate.
So what to do?
Options are to run the TM magazines as normal and fix any issues as they arise or perform a pre-emptive strike and strip the magazine to seal the safety valve.
Which ever you decide to do, here's a break down of how to go about it and what you'll need.
1. Drill with 3mm drill bit
2. Replacement O ring sized 20mm ID with a Cross section of 2mm
2a. Replacement O ring sized 19mm ID with a Cross section of 2.5mm - this is much harder to fit but gives a tighter seal.
3. Epoxy glue (such as Araldite)
4. Hammer (or suitable substitute)
5. Punch Pin (suitable substitute)
First step is to make sure the magazine is empty of gas and ammo then proceed as follows:
To strip the magazine all you need to do is punch out the securing pins holding the base plate on. If this is a Tokyo Marui Magazine you'll have to drill out the blind locking pin first, you'll only need to drill through about 3-4mm.
1. Use a 3mm drill bit to drill this blind pin. You only need to go 2 or 3mm deep.

2. Using a hammer and punch pin, knock the pins out from the same side as the locking pin (Right through to Left) A magnet is handy at times like this.


3. Pull the magazine base plate free.

4. On one side you'll see the safety valve.

5. Run a file over the area where the blind pin was to clean any burrs.

6. Remove the safety valve and fill the hole flush with epoxy glue, you'll have to follow the instructions on the packet. Once all the base plates you're treating are done level them to let the glue dry for the specified duration.
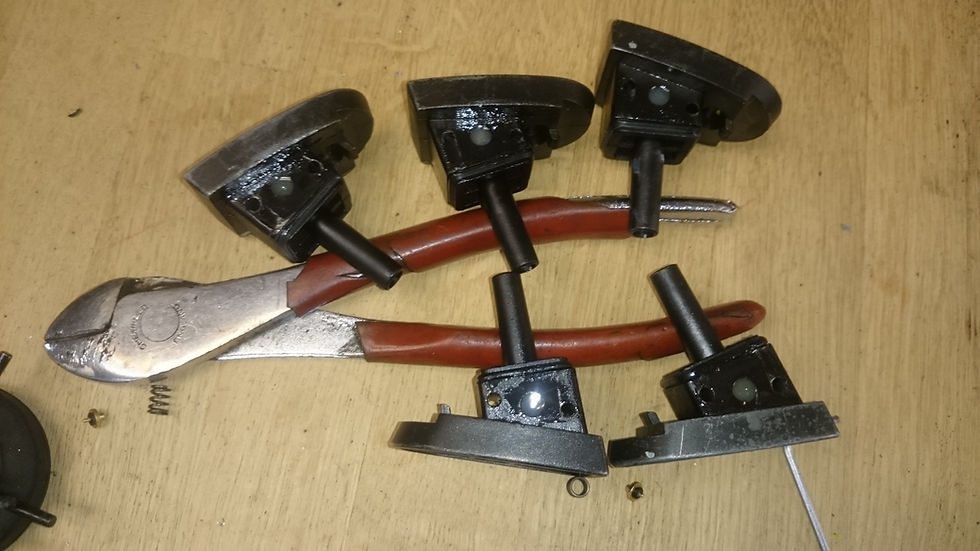
7. Install replacement O rings, the use of an Allen key (HEX key) can help here.

8. When reassembling care must be taken not to nick the new O rings on the pin holes.
If using original spec O rings then reassembly is quite easy. Apply plenty of silicone based lubricant and reassemble. Taking note to insert the pins into the pin holes left to right with the smooth side of the pin first.
8a. If using after market O rings they tend to be slightly larger than stock. The ones used here are 19mm ID with a cross section of 2.5mm. This makes reassembly is much harder. This process can be made slightly easier if you place the pins through from opposite sides half way through, and then take care to locate in the opposite side of the magazine shell, but the use of a bench top vice may be required - just take care to grip the top part of the magazine behind the mag router.

9. Gas you mags and test!
To keep the mags it top condition, never leave them without any gas in as this other than trauma (dropping the mag) is the most likely cause of leaks.
After every game, remove the bb's to keep the spring in good use and re-gas - just store them out of Sunlight and in the cool.


Comments