
Straight Outta Asgard (3D Evolution Hammer Shield)
- Apr 15, 2019
- 9 min read
Back in December last year, I had met up with ON MY MK's Gary in the UK en-route to a meetup of Sniper Ops players in the south of the UK. Whilst killing some time on the road as we drove to the meetup, we were discussed the consequences of using our MK23's in poor, rainy, weather conditions (What?! It's a perfectly normal thing to talk about whilst on the road!) - and how water, once it found its way in to the trigger mechanism and hop up could start to really affect the guns performance.
We sketched up a rough idea to cover the rear of the pistol and the hammer with some sort of primitive PVC molded shell held on with some elastic around the trigger guard and left our thoughts on the matter at that. The very next day, we saw a post go up in the Sniper Ops community with the following image:

It's as if by some divine MK23 cult magic, a fellow MK23 owner had heard our plight and come to answer our call for a means to help protect against poor weather - at least at first glance.
What we gleaned from in this post, was just the beginning of what would later come to be known as the "Hammer Shield" hammer cover, and be fronted by David's 3D printing label, 3D Evolution.
A "god" idea
Whilst we saw this as a gift from the Dwarven sons of Ivaldi themselves in form of a rain cover, David on the other hand had a much more useful and helpful ambition in mind when he forged his innovation. Davids goal was to prevent the accidental engagement of the hammer on the clone MK23 - an incredibly annoying and inconvenient occurrence that would result in the valve knocker being pushed forward and venting gas from the magazine (and discharging the loaded gun). His cover accomplished this effectively on the first go, and very ingeniously clipped on to the slide iron-sights with a friction fit 2-piece assembly that would hold it in place without screws. Suffice to say, it garnered a lot of attention from clone pistol users who knew the hammer issue all too well - however, the initial design was quite literally, not watertight; and had some obvious room for improvement.
Jumping at the chance to kill two ravens with one stone, we contacted David at the soonest opportunity to share our thoughts on his design, and how it could, with a little redesign, address our waterproofing concerns. Cue version 1.1.

As you can see from a quick comparison between the first version and the image above, David got back to us pretty quickly, with the shell extended back and the open hammer section filled in to provide full hammer / rear slide coverage to offer full all-round protection against rain and debris entering the internal mechanism from the hammer (in addition to preventing the hammer from being pushed forward). With the rear covered up, we could see the Hammer Shield starting to form.


Our chief interest from here was to find out how it dealt with an onslaught of water to simulate torrential rain (as a worst case scenario), and we got results on that equally quickly. Check out the clip below demonstrating the cover's water resistance, and a image of the slide immediately after removal of the cover:


The results were impressive; enough so that we were happy enough to put an order through to get our hands on it and put it through testing for ourselves.
A couple of weeks later, our unit arrived, and well... things didn't go quite as well as planned once we tried to fit it.

As with anything once delivered to your intended user... the true testing begins, and we certainly covered the bases.
We identified several flaws with the locking retention tab, which would slip under the lip at the rear of the slide. The retention tab was design to flex under tension, but lacking filament and a weakness on the seam created a weak-point, causing the tab to snap and the covers retention to be lost entirely. There were also a number of print quality issues, tolerance differences between a clone and TM and some, optional design improvements raised that were worth consideration.
Worth betting your head on
David received our feedback well and over the course of the next 3 months since the first images of the Hammer Shield appeared in the community, a product truly worthy of display before Thor started to materialize.
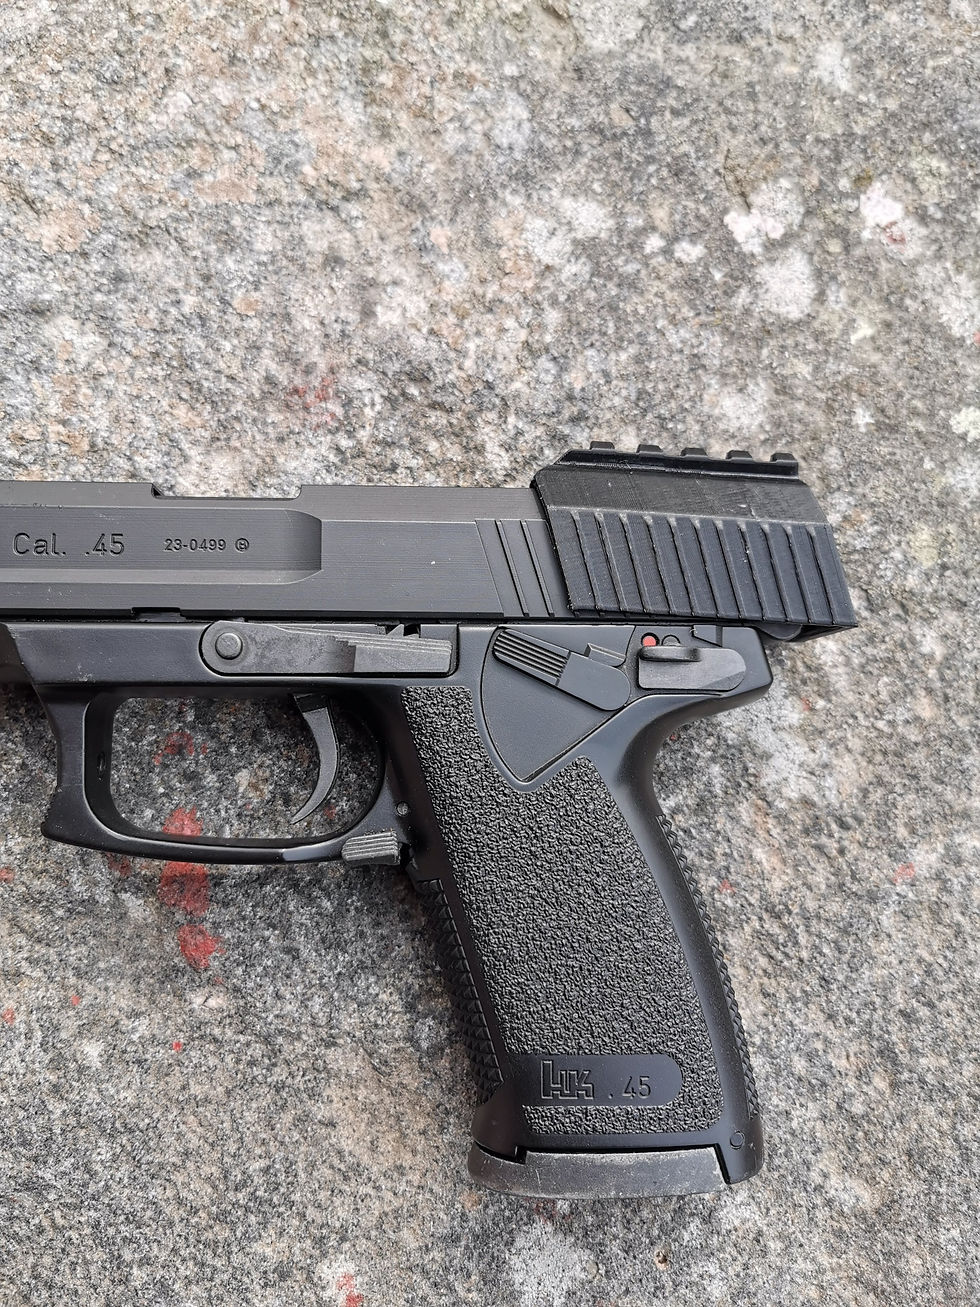
This is the Hammer Shield as it appears today.


As you can see, David spent some considerable time in the blacksmith.
The bulbous, unflattering curved shape of the Hammer Shield we knew from before was gone, replaced instead with a refined, serrated, angular and imposing design. The empty, useless space at the top of the cover was fortified with a 20mm rail section for use of rear mounted reticles and optics, a middle cut-out section carved through it to allow the use of the iron-sights whilst the the cover was fitted. Looking back at the first version, our final review model is nothing short of impressive.
Let's take a look at some more angles without the optic attached:


That's not the influence of Loki's tricks you're feeling, it's OK to be a little envious at this point!
With the externals shown off, it's about time we take a look at the internal aspects of the Hammer Shield - how to mount it and how the retention works, since we've shown very little of that side of things up to now.
Two become one
As we touched on earlier, the Hammer Shield is formed of two parts, the upper part which fits to the slide and around the iron-sight, and the lower part, which locks the upper in place and surrounds the hammer. When combined together, they make the Hammer Shield a very sturdy piece of kit and something anyone should be confident to mount an optic on.
Here's how the two parts look.
The upper:


The last image in that lot of 4 is particularly worth paying attention to, from here, we can clearly see the retention locking tab. This locking tab was originally the cause of much concern, and required significant rework to inspire long-term confidence and robustness during testing. The current implementation as it stands now has forgone much of the flexibility it had before, instead opting for a better locking angle and thicker structure to secure under the slide lip.
To note some of the other changes, the channel between the two lower sections was also widened out, to allow better hammer travel on the TM version of the pistol, the bottom of the upper sides was corrected to be straight and in parallel with the bottom side of the slide. Lastly, the overall print quality was improved across the upper in general.
The Lower:


From these images you can clearly see the hooked arms of the lower that will lock in to the upper cavity. Each arm is split down the middle to give them some spring and provide a tension and friction based lock in the upper.
The lower also provides the space for the hammer to travel fully back in the Hammer Shield enclosure, for both the Clone and the TM versions (which each have a slightly different amount of hammer travel). The lower section required very little change during development and worked pretty much as it should have from the start.
Lower and Upper combined:


The set of images above show how the Upper and Lower come together to create the shield itself, obviously without the slide to brace against to provide retention. The two parts together provide a very decent water and dust free enclosure for the hammer to operate in.
With the two parts highlighted, the next step is to demonstrate how they interlock and fit to the pistol itself.
Installation:
Step 1: Place the upper at a angle so the inner retention tab sits directly below the slide slip (it's helpful to cock the hammer back before trying to mount the upper).

Step 2: Gently push the upper forward from the back flat section of the upper towards the muzzle so that the port at the top of the upper covers the iron-sight and aligns with the front of the iron-sight. Once in position, gently push down from the top of the cover so that that it sits as flush as possible on the top of the slide.
Step 3: With the upper sitting flush to the slide, insert the lower at an angle with the arms against the tail (safety lever side) of the slide. If the upper is in the correct position, each arm will naturally find a slot with the upper to insert in to. Once at an angle, you may need to pinch the split of the arm together and push from each side of the lower one at a time to get the arms to insert up in to the upper correctly. With each arm in position, just push the lower section up in to the upper until there is an audible click. This click will mean that the lower and upper have correctly meshed and are providing retention. The upper will be completely flush and secure at this point.


Step 4: Just to cover it, to remove the lower from the upper, just pull the lower downward (give it a good tug if needs be) and the lower should slip out from the friction lock.
Some points to consider once the Hammer Shield is installed; you will not be able to take off the slide, but you will be able to rack the slide back - so try to do all your internal upgrades and maintenance before you install the Hammer Shield to save some effort.
With Hammer Shield installed, you're good to go but we recommend giving the pistol a quick functional check to see that the trigger operates as it should and the hammer travel is unaffected. Here's a quick post installation demo:
So that's all there is to it. So how did we get on with it in practical usage?
Vahalla can wait
We took out the Hammer Shield to the skirmish fields of war several times over our testing period, with and without optics mounted to it - in both adverse and decent weather. The aim of our practical test was to primarily identify if the cover would stay attached to the pistol throughout each session, or become dislodged or misaligned. We focused on this aspect because any loss of structural integrity to the cover would either result in the hammer failing to function, water / debris getting in to the enclosure, or most costly of all - the upper section being lost along with the pricey optic on top of it.
For the majority of the games, the pistol, equipped with the Hammer Shield, spent its time in a holstered position directly under the left arm concealed by a ghillie hood. This position meant that it had an increased chance to snag the ghillie as the arms moved passed it - and on several occasions the optic thumbscrew actually did get caught in some raffia loops - pulling arm movement to a halt until it was unraveled. Yet despite this, the optic attached to the upper section of the cover remained securely in place, something we would have expected to dislodge the upper entirely.
When used in "anger", the pistol could be operated flawlessly, with a clear sight picture provided by the cover's recessed iron-sight grooves when sighted in without an optic. With an optic present, the height of the cover did not make the looking through the optic feel unnaturally high off the bore and still provided quick and reliable targeting at targets within close range.
In terms of environmental resistance, dragging the covered pistol through the snow filled rocky regions of Norway kept the hammer area clear of obstruction - an area that would have otherwise quickly filled with compacted snow after several hammer strikes. In warmer weather, the dusty / muddy dirt of the forest floor also found itself rightly barred entry to the hammer and trigger mechanism. Here's a prime example of what was avoided once the Hammer Shield was installed:

All in all, with the retention issues resolved, our final review version of the Hammer Shield proved it a worthy addition to have on the pistol, and one that certainly fulfilled its intended purpose - but one notable disadvantage we observed when using it was the obvious loss of ability to manually cock the hammer back using a thumb. Whilst this does not sound like a huge loss of function, due to the two-stage triggering being able to pre-cock the hammer on its own, many veteran users of the MK23 have come to rely on using their thumb to pre-cock the hammer. As such, this would obviously be a concern for players using this method and likely reason enough to forgo using the Hammer Shield entirely.
Another point for some players to consider is that of the Hammer Shields rail position. With the rail being so far back on the pistol, the optic can only be mounted to the rear of the MK23, above the iron-sights. Whilst this may seem logical to most people, some users may prefer a more forward mounted optic position (like those afforded by the Double Tap Designs or Hadron Airsoft Designs rail mounts) for easier sighting and sight alignment based on their grip and drawn position. We suspect that this is a minor point of contention and something any shooter could retrain for anyway.
In summary, we're very pleased with 3D Evolutions first foray in to the 3D aftermarket MK23 parts world. They initially identified a problem present on all clone MK23 models, developed a solution to address is, whilst eliminating another problem (the rain!) at the same time. Being faced with the "horse fly"-like sharp sting of constructive criticism, David powered on through it to define his product to a final iteration worthy of such a bold name. The Hammer Shield is a great piece of innovation, and is at its core is exactly what defines the MK23 community and its reputation to keep on pushing boundaries beyond any other platform currently available on the market.
If you're interested on picking one up for yourself, head over to the 3D Evolutions social media pages and contact them directly, as of this time, you won't find the Hammer Shield on any retail shelves - but we certainly wouldn't be surprised to see that change in the near future!
Facebook:
https://www.facebook.com/3devolutiondesign/ Instagram: https://www.instagram.com/3d_evolution.co.uk/
As usual, thanks for your time!


Comments